|
The inspector panel is the bottom right panel on the Report Designer. It is used to modify object attributes.
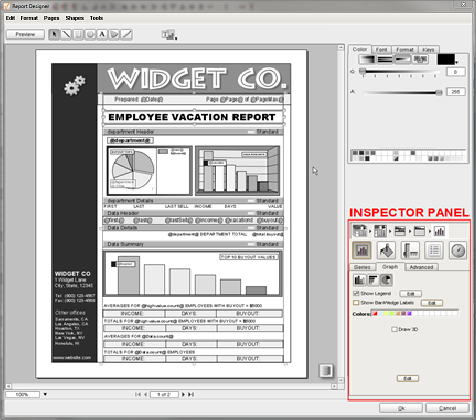
Tutorial #2 example report.
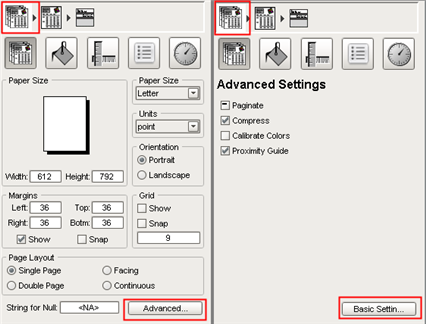
Document Inspector
The Document Inspector is where you set your page layout, paper size, margins, and other top level properties.
Page Inspector
The Page Inspector deals with document layers. "Layers" are logical grouping containing anything between no objects and every object that takes the space of the whole report. For example, you could create a background layer that contains borders and graphics. You would then create a main layer that is the bulk of the dynamic report. When working on one layer, you could make the other invisible. You can also lock a layer once you're finished with it.
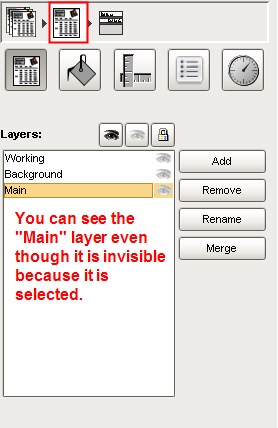
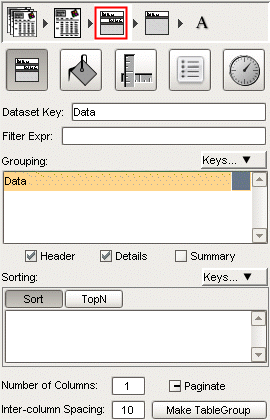
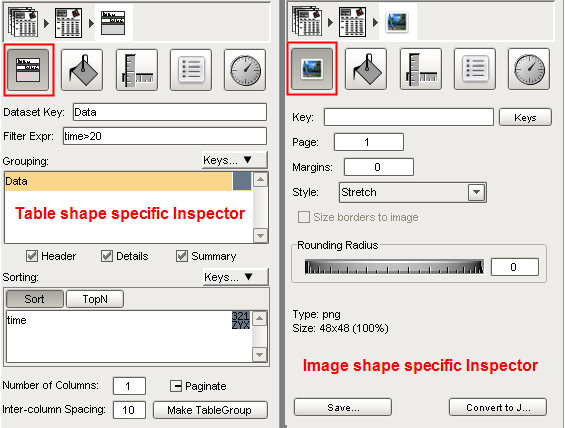
Table Inspector
The Table Inspector defines the dataset, sorting, grouping, and filtering for tables. It is where you choose to display a table's header, detail, and summary.
The Table Inspector can modify data processed by the table, as well as the general look of it.
Paginate - Has three setting (Off  , On , On  , N/A , N/A  ) option that determines whether or not a table will use page breaks. Paginating tends to be useful for pdf files, not paginating tends to be good for Flash and CSV files. Typically leave this setting alone. ) option that determines whether or not a table will use page breaks. Paginating tends to be useful for pdf files, not paginating tends to be good for Flash and CSV files. Typically leave this setting alone.
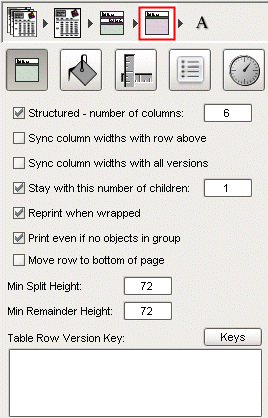
Table Row Inspector
The Table Row Inspector defines properties of rows in a table. This includes all versions of the header, detail, and summary rows, as well as specifying the version key expression and printing options. It is most easily accessed by superselecting the table, then selecting a table row.
Row Property
|
Function
|
Structured Switch/Column Count
|
Sets row to unstructured or defines number of columns. This can also be done with table icons.
|
Sync with parent/alternates
|
With structured tables, it's often convenient to have column resizing be reflected in the row immediately above the current row (the parent) or with a table row's different versions (alternates). Once enabled, individual column resizing will affect the corresponding parent or alternate row width. This is useful for synchronizing detail/header row changes.
|
Stay with this number of children
|
This is the heart of widow/orphan control. By default, a row is guaranteed to have at least one child in its group on the same page. This prevents such rows from being printed by themselves, which can be confusing. Increase this number for additional family bonding. If it exceeds the number of objects in a group, the group will never be broken across a page boundary.
|
Reprint when wrapped
|
When data overruns the bottom of the page and starts on a new page, upper level grouping details and headers are reprinted to retain context. Occasionally this doesn't makes sense. Select the row and click this switch to suppress this behavior. An alternative is to configure a Reprint version.
|
Print even if no objects in group
|
By default headers and summary rows for empty lists are suppressed. If you want an indication of the missing data turn this switch on.
|
Move row to bottom of page
|
Normally the Summary row will share a border with the last row on the table. Move to Bottom will move it down slightly so that it's always resting on the bottom border of the page. This is commonly used with the Running Summary feature.
|
Min Split/Remainder height
|
An advanced form of widow/orphan control is to be able to control how an exceptionally tall table row will break across a page (usually only the case when a large text block is involved). By default rows will only be split when at least an inch (72pts) was available on the first page (min split height) and at least an inch will be carried over to the successive page (min remainder height).
Most table rows will never use these settings. If you prefer to have table rows use all of the potential page space and don't care about trying to keep related text on the same page, you would set both of these to 10pts. If you never want a row to split, set these to 999.
|
Table Row Version Key
|
Allows you to configure different looks for the same table row based on some condition to provide visual hints.
The version key expression should return a string that is the name of a version that you've defined. Details here or example here.
|
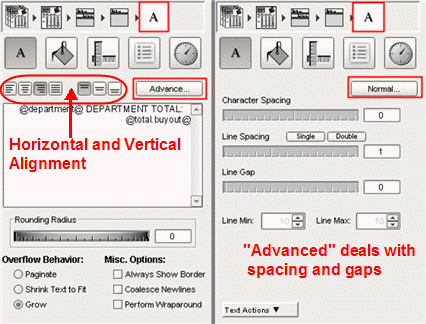
Text Inspector
The Text Inspector is where you specify text alignment. More details under text editing. You can use this larger textbox to edit text instead of making text changes directly on objects.
Option
|
Function
|
Rounding
|
This thumbwheel allows you to set the rounding radius for the text border. It's immediately reflected in the editor window.
|
Overflow Behavior
|
Text can be set to paginate for form letters, shrink text to fit for static text boxes that may receive arbitrarily long text, or Grow for text fields in table rows (which can grow to accommodate large text blocks).
|
Always Show Border
|
Draws a gray border around text even when not selected. Sometimes useful as a visual cue while editing, without marking generated reports.
|
Coalesce Newlines
|
Coalesced newlines will make sure text uses the minimum lines necessary. Useful for substituted data that might contain missing keys, eg, "@name@\n@address1@\n@address2@\n@phone@\n@fax@".
|
Tab Stops
|
If you turn on rulers for the editor window (Tools->Toggle Rulers menu), you will notice that it shows tab markers while editing text. These can be dragged and reset to change the tab stops of the text field.
|
Shape Specific Inspector
The Shape Specific Inspector changes depending on the selected object. It often takes the form of the other inspectors listed on this page. Some objects have custom shape specific inspectors. The left example below is the shape specific inspector for a table, which happens to be the table inspector. The right inspector is the custom shape specific inspector for an image.
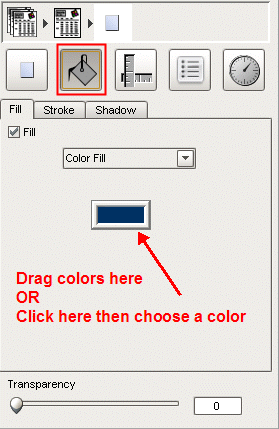
Fill & Stroke Inspector
The Fill & Stroke Inspector is where you set background (fill), outline (stroke), and shadow.
Location & Size Inspector
The Location & Size Inspector allows you to see actual positioning, set auto-sizing, and change properties such as: rotation, scale, and skew. Auto-sizing works by clicking the different regions in the auto-size boxes to draw or erase "springs".
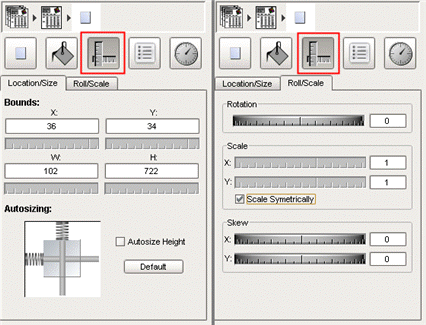
Roll, Scale, & Skew Inspector
The Roll, Scale, & Skew Inspector is a powerful panel that lets you set properties based on expressions (string or number based). You can do things like:
| • | Use isVisible property to display an image of a fancy checkbox or exclamation in the row of a table. |
| • | Scale the width property of a rectangle with a gradient color within a table to indicate progress. |
| • | Conditionally change fontColor or fillColor |
| • | Dynamically position an object around with X and Y properties. |
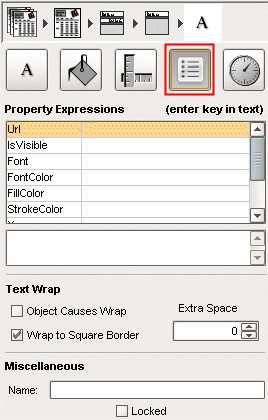
See Property Expressions to illustrate their dynamic use.
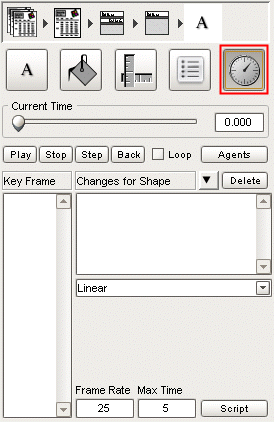
Animation Inspector
The Animation Inspector is used to set up animation, which works, but will not be useful unless Reporting enables Macromedia flash based reports. You set up snapshot times and the report will morph the scene from one time to the other.
TIP
|
The inspector panel varies on an object by object basis. If you have trouble changing a property on a complex object, chances are it's here. Try clicking on different parts of the object then going through the Inspector Panel.
|
Copyright © 2001-2005 Inductive Automation, Inc. All Rights Reserved.
|