If you have the Symbol Factory module installed, you've got nearly 4,000 industrial symbols at your fingertips. The first step to using the Symbol Factory is to open up the Symbol Factory browser. To do this first launch a Designer. Once the Designer has your project open, choose Symbol Factory under the Tools menu or the project navigation tree. If you can't find these, the Symbol Factory module probably isn't installed.
The Symbol Factory browser opens as a pop-up window that stays on top of the Designer. You can browse the different categories to explore what symbols are available, or search to find a specific symbol. When you find a symbol that you'd like to use, you can simply drag it onto an open Vision window. From there, the symbol will become a group of shapes. Just like any group, you can double-click on it to get to the shapes inside, or simply un-group it. This way you can edit the symbol if you need to. Note: If the Symbol Factory module is in trial mode, you'll only be able to use the first symbol from each category.
Symbol Factory Tip #1: Animating the Tint on a Grayscale Symbol
Suppose you have chosen one of the many grayscale symbols, such as the "3-D Valve" symbol from the Valves category. Let's say you want to tint the valve green when the valve is open, red when the valve has a fault, and keep it gray when the valve is closed. Suppose you have a tag, let's call it ValveStatus, that is 0 for closed, 1 for open, and 2 for faulted. Follow these steps to tint the symbol as described above:
| 1. | Drag the symbol onto the screen. |
| 2. | Duplicate the symbol by selecting it and choosing Duplicate from the Edit menu, or pressing CTRL-D. Now, select the duplicate symbol, which will be above the original. |
| 3. | Press the Union button ( |
| 4. | Remove the outline by setting the Stroke Paint property to No Paint. |
| 5. | Bind the Fill Paint property to your ValveStatus tag. Add three entries into the number-to-color translation table: fully transparent for zero, 40% opaque green for 1, and 40% opaque red for 2. |
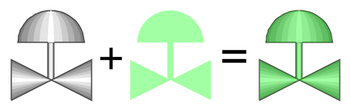
Understanding the tinting technique
In summary, what we did to tint the symbol was to make a flat shape that had the exact same outline as the symbol, and use semi-transparent fills to achieve a tint effect for the underlying symbol.
Symbol Factory Tip #2: Using Cutouts on Tanks
The symbols in the Tank Cutaways category work well when combined with the symbols in the Tank. Use the following technique to make a dynamic cutaway tank display:
| 1. | Drag a tank and a cutaway symbol onto the window. Align the cutaway symbol on the tank where you'd like the cutaway to be placed. |
| 2. | Select the tank symbol, and then select the cutaway while holding CTRL to select both symbols. Press the Difference button ( |
| 3. | Place a Level Indicator component on the area removed by the cutaway. |
| 4. | Push the Level Indicator below the tank, and bind it to a SQL tag to create a dynamic display. |
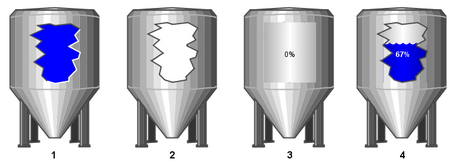
Dynamic cutaways are easy with vector-based symbols