Using parameterization and indirection in your screens is an important way to reduce the amount of repetitive design work required when creating your project. For example, suppose you have 35 valves that need to be monitored and controlled. By creating one valve control screen and re-using it 35 times, you save time creating your system and you'll save time in the future when you only have to update the single valve control screen. There are two concepts that are required to achieve this in Ignition: indirect data binding and parameter passing.
Indirect Data Binding
Indirect data binding is the most important concept to understand in Ignition if you want to avoid a massively repetitive design. The idea here is that your data, whether it is in SQLTags or data in a SQL database, is organized in some predictable pattern. For example, if you had 35 valves's worth of tags in SQLTags, their tag paths would be predictable based upon the valve number:
Facility/Valves/ValveX/HOA
Facility/Valves/ValveX/Flow
Facility/Valves/ValveX/OpenPct
... where "X" would be replaced with the numbers 1 through 35.
Once your data is organized in a predictable pattern, you can use indirect data binding. Indirect data binding is any data binding where the target of the binding changes based upon some parameter in the window. For example, all of the bindings to display and control the valve would dynamically point to any of the 35 valves based upon a single parameter. If you're unfamiliar with Ignition's data binding, you might want to review the entries in the Property Binding section (Property Binding Overview).
Indirect Tag Binding
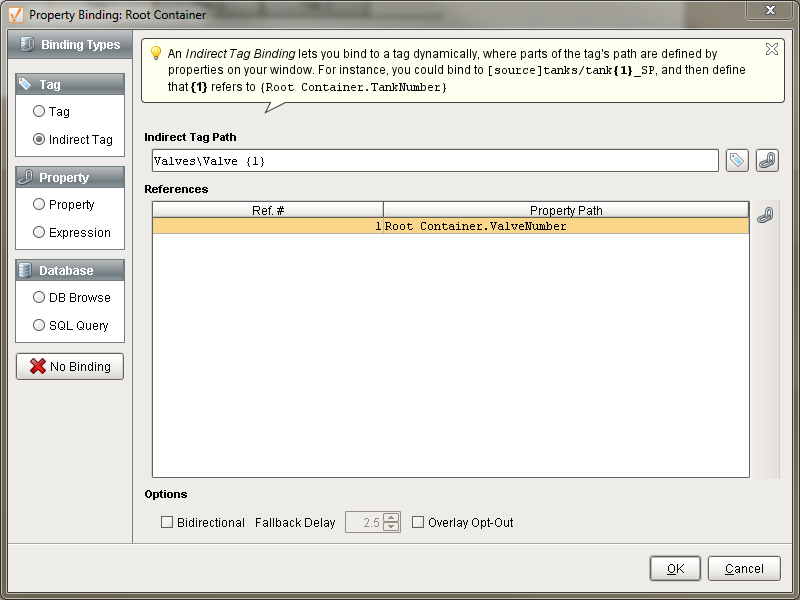
The first and easiest way to use indirection is to use the indirect tag binding. The first step is to have some value that you'll use as the indirection parameter. Usually this would be a custom property, often placed on the Root Container of a Window. Let's call it "ValveNumber." Then create the display/control screen for the valve, but instead of using standard tag bindings for your components, use the indirect tag binding. Browse for the appropriate tag from any valve, highlight the valve number in the path, then replace it with {1}. Below in the References section you will see that a new entry has been created with a 1 in the Ref.# column. This refers to the {1} that you replaced the valve number with. Click on the first row in the References section, then click the property icon. Browse down through the property tree until you find the ValveNumber property located on the root container. Now your binding will point to whichever tag is indicated by the value of ValveNumber.
You can add as many references you want. Each reference you add (e.g. {5}) will add a row into the references table. This reference will then be replaced by whatever property value that you map it to. Essentially all you are doing is building a tag path using references as placeholders that are replaced with dynamic values at runtime. To take advantage of this feature though requires some forethought as to how you are going to structure your tags. A good naming convention can make the design process a lot easier.
Indirect Expression Binding
The second kind of indirection is through the expression binding. This is an extremely versatile binding type. In particular, there is the tag() expression, which will return the value of a tag path. The tag path itself can be constructed using other expressions, which can easily be indirect. For example, if we wanted to bind to the valves' "OpenPct" tag and also multiply by 100, we could use an expression like:
tag(
"Facility/Valves/Valve" +
{Root Container.ValveNumber} +
"/OpenPct"
) * 100.0
SQL Query Indirection
Lastly it is worth mentioning that the SQL query binding is also a capable of indirection. The query itself can be altered by embedding the value of other properties. For example, suppose we logged all of our valve's flow rates to a table. We could use a query binding like this to calculate the average flow over the last 15 minutes for our current valve:
SELECT
AVG(Valve{Root Container.ValveNumber}Flow)
FROM
ValveFlowHistory
WHERE
t_stamp > DATE_SUB(CURRENT_TIMESTAMP, INTERVAL 15 MINUTE)
Window Parameters
Putting indirect designs like those described above into popup windows is a great way to maximize the benefit of indirection. By passing the ValveNumber into a popup window, we can re-use the same window across our entire project simply by altering the valve number that we pass to the popup window. Passing parameters to windows is simple. Any custom property on the root container of a window can be used as a window parameter. On a button or other control that opens the window, simply call one of the navigation functions via scripting in the following manner:
value_to_pass1 = event.source.parent.ValveNumber
value_to_pass2 = event.source.parent.TankNumber
system.nav.openWindow('Main Window',
{'TheValveNumber':value_to_pass1, 'TheTankNumber':value_to_pass2})
In the above example TheValveNumber and TheTankNumber are the name of properties residing on the root container of the window that is to be opened. You can only pass parameters to properties that reside on the root container of the window that you want to open.
That's it! When the window is opened, its TheValveNumber property will be set to the appropriate value and the bindings will target the correct valve.